Workflows for Collaborative Scholarly Publishing
Introduction
Communication of your research to others is a core component of life in academia. This is done through lectures, workshops, and most notably: papers. It is therefore highly beneficial to develop effective practices for publishing your results via papers.
We identify several requirements for a competent publication workflow.
- easy collaboration with others
- flexible output formats
- integration with a reference manager
- version control
Below, we propose two opposing solutions that meet these requirements, and suggest a middle ground.
Robust Workflow
Scholarship is a collaborative and iterative process, where small changes build up over time to create a final product. Further, we should strive to make our research process as open and transparent as possible. The workflow I propose as a solution to these problems is a workflow that prioritizes open source tools, version control, and reproducibility.
This article describes a collaborative scholarly workflow for digital-first publishing. There are several elements of this workflow, below is a list of how they fit together.
- File Format: Markdown
- Version Control: Git
- Hosting: GitHub
- Citation Management: Zotero
- Text Editor: VS Code
- Conversion: Pandoc
“Quick” Start
Software Downloads
- Zotero
- Better BibTex - Zotero plugin that allows for better citation management
- VSCode
- Pandoc Citer - VSCode Extension that will allow us to cite in Markdown easily
- Pandoc Render - VSCode extension that allows for a reproducible pandoc rendering command, will allow for a faster way to render documents
Creating a new project
- Create a new repository on GitHub
- Clone the empty repository to your local machine
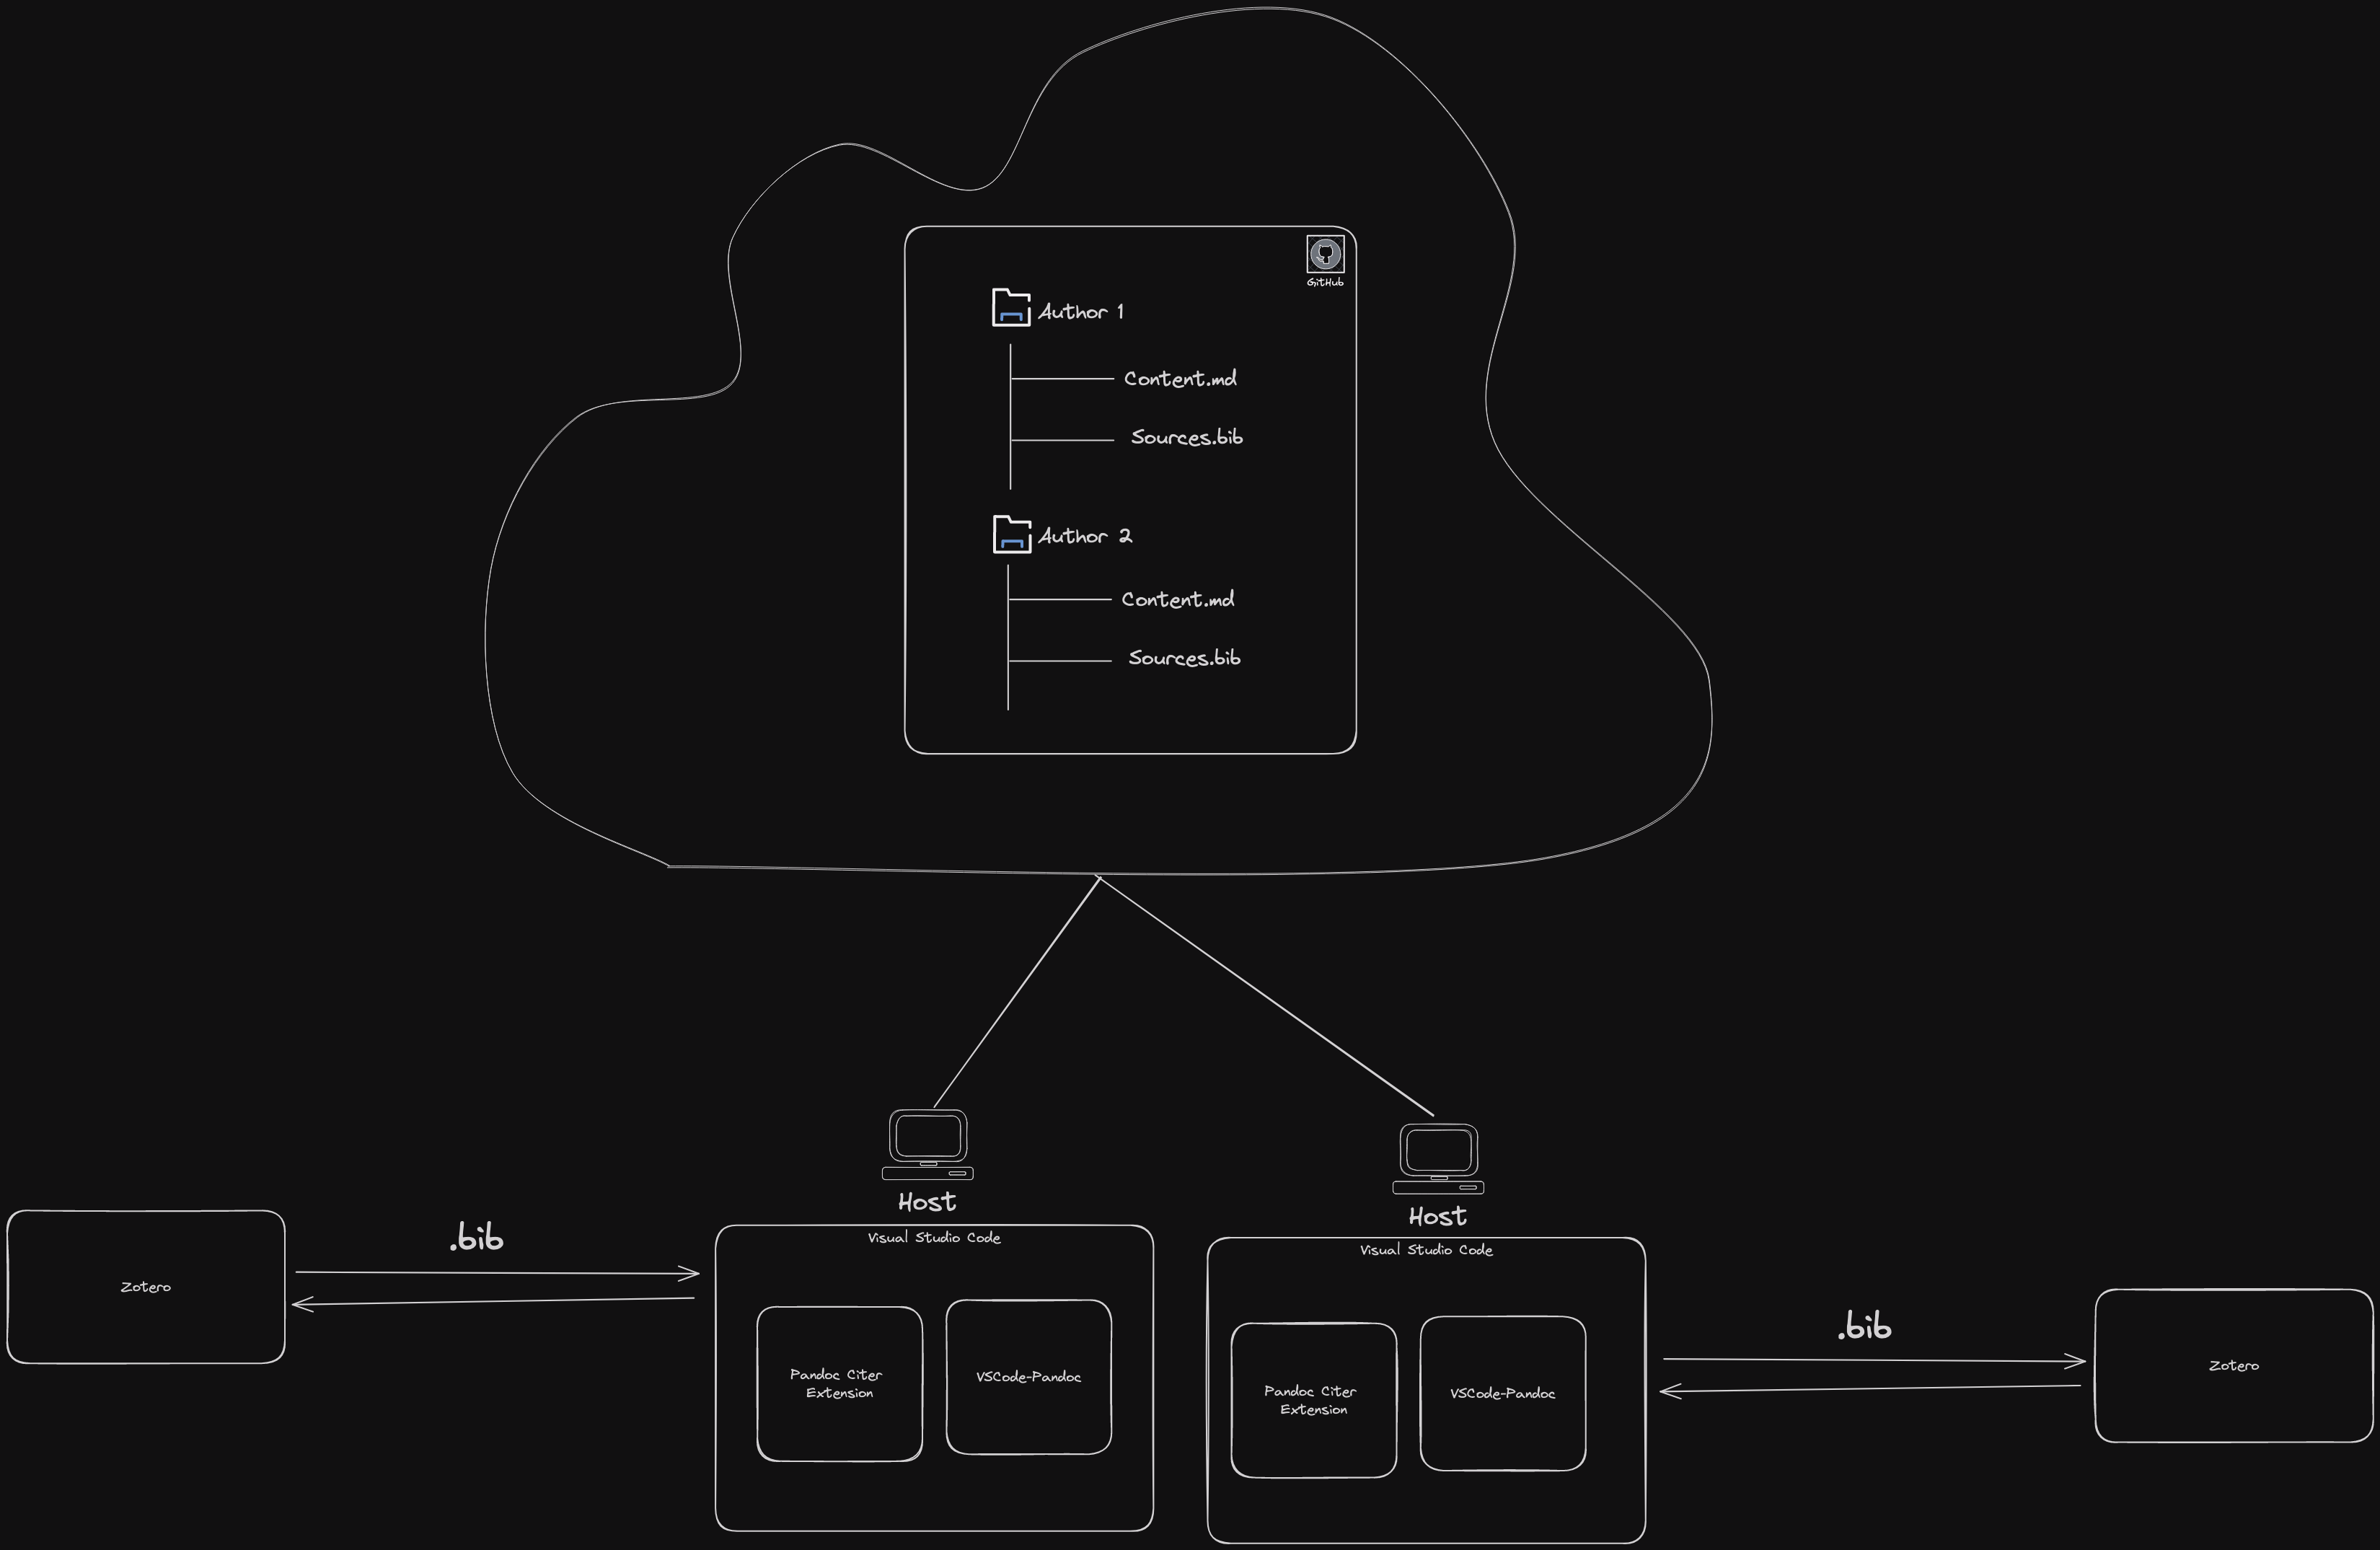
- Create a folder for each author on the project such that the folder structure looks like this:
project
├── author1
│   ├── author1_content.md
├── author2
│   ├── author2_content.md
Autoexporting .bib file
- Create a .bib file in the root directory of your project
- Configure Better BibTex to export to this .bib file
- Enable automatic export
Now you can add citations from the zotero browser plugin, and they will automatically be added to your .bib file.
Now, if you are author1, your folder structure should look like this:
project
├── author1
│   ├── author1_content.md
│   ├── author1.bib
├── author2
│   ├── author2_content.md
Author2 will set up their own sources on their own machine, and will have their own .bib file.
Setting up VSCode
Now, we want to start writing, to do this, open VSCode.
- Open the project folder in VSCode
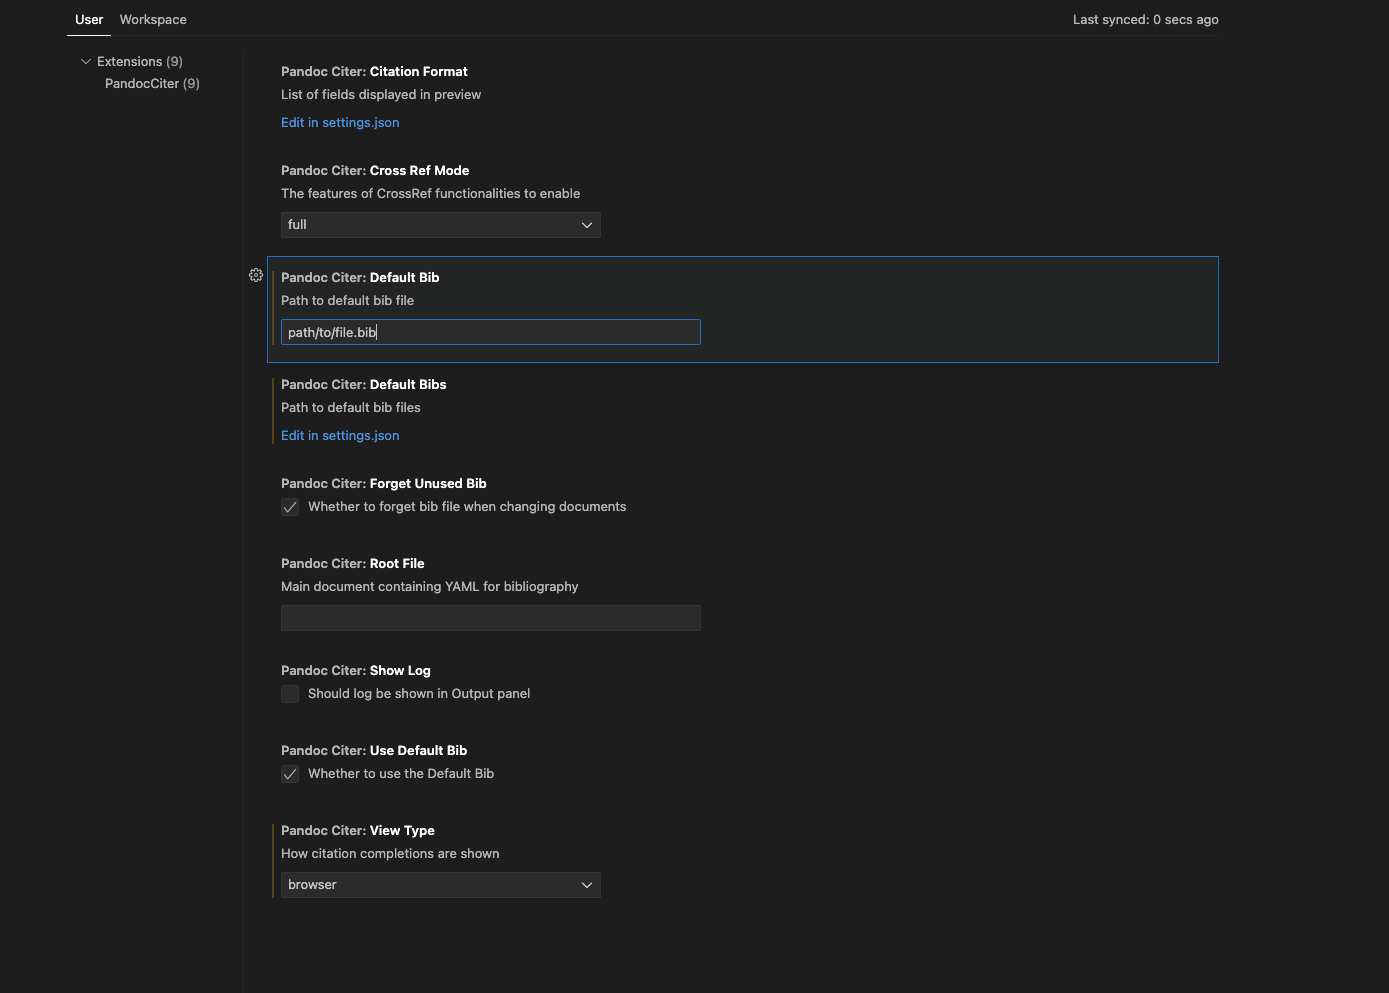
- Open the pandoc citer settings, and have the .bib file point to wherever your .bib file is stored.
Setting up Zotero and Better Bibtex
Follow the instructions for installing Better Bibtex here: Link
Follow the instructions for configuring Better Bibtex here: Link
Open the pandoc citer settings, and have the .bib file point to wherever your .bib file is stored.
Now, when you type @ in a markdown file, you should see a list of your citations.
Setting up Pandoc Render
Pandoc-render makes a reproducible pandoc command, which will allow you to render your document from the VS Code terminal. You don’t have to use the command line to render your document now!
A Note on CSL files
CSL files are citation style language files, which tell pandoc how to format your citations. You can find a list of CSL files here:
Follow the instructions for installing vscode-pandoc here: Link
Open the vscode-pandoc settings, and set the pdf output command to something like the following:
--csl=<path/to/your/csl/file.csl> --metadata link-citations=true --filter mermaid-filter --filter pandoc-crossref --citeproc --standalone --from=markdown+yaml_metadata_block
Let’s break down what this command does:
--csl=<path/to/your/csl/file.csl>: This tells pandoc where to find your CSL file, which will tell pandoc how to format your citations--metadata link-citations=true: This tells pandoc to link your citations to the bibliography--filter mermaid-filter: This tells pandoc to render mermaid diagrams--filter pandoc-crossref: This tells pandoc to render cross references--citeproc: This tells pandoc to use the citation processor--standalone: This tells pandoc to render a standalone document--from=markdown+yaml_metadata_block: This tells pandoc to render from markdown, and to use the yaml metadata block
You can also use this command for all the other output formats, but I tend to only use PDF and sometimes DOCX if I am working with someone who is not familiar with Markdown.
Now, when you type ctrl+shift+p and type pandoc, you should see a list of commands, including pandoc render, which will then show a list of output formats. Select the PDF, and it will render your document.
Let’s Start Writing!
You can now start writing your document, you can use VSCode to write your essay/article/book/dissertation, use bibtex keys to cite sources, and then render your document to PDF, all while using git to track changes and collaborate with others.
Simple Workflow
This workflow aims to follow one guiding principle:
Minimize friction by keeping the technical barrier low
In this end of the spectrum, we aim to use tools most non-technical users would already be familiar with. This sacrifices flexibility that may be available in more dedicated tools, instead aiming for a simpler user experience.
Zotero
Zotero is an open-source reference management tool. It’s incredibly useful to organize, read, annotate, and cite academic papers. For a collaborative workflow with Zotero, the simplest approach is to let one author manage the citations in their own library, and implement them in the manuscript using the practices described later in this post.
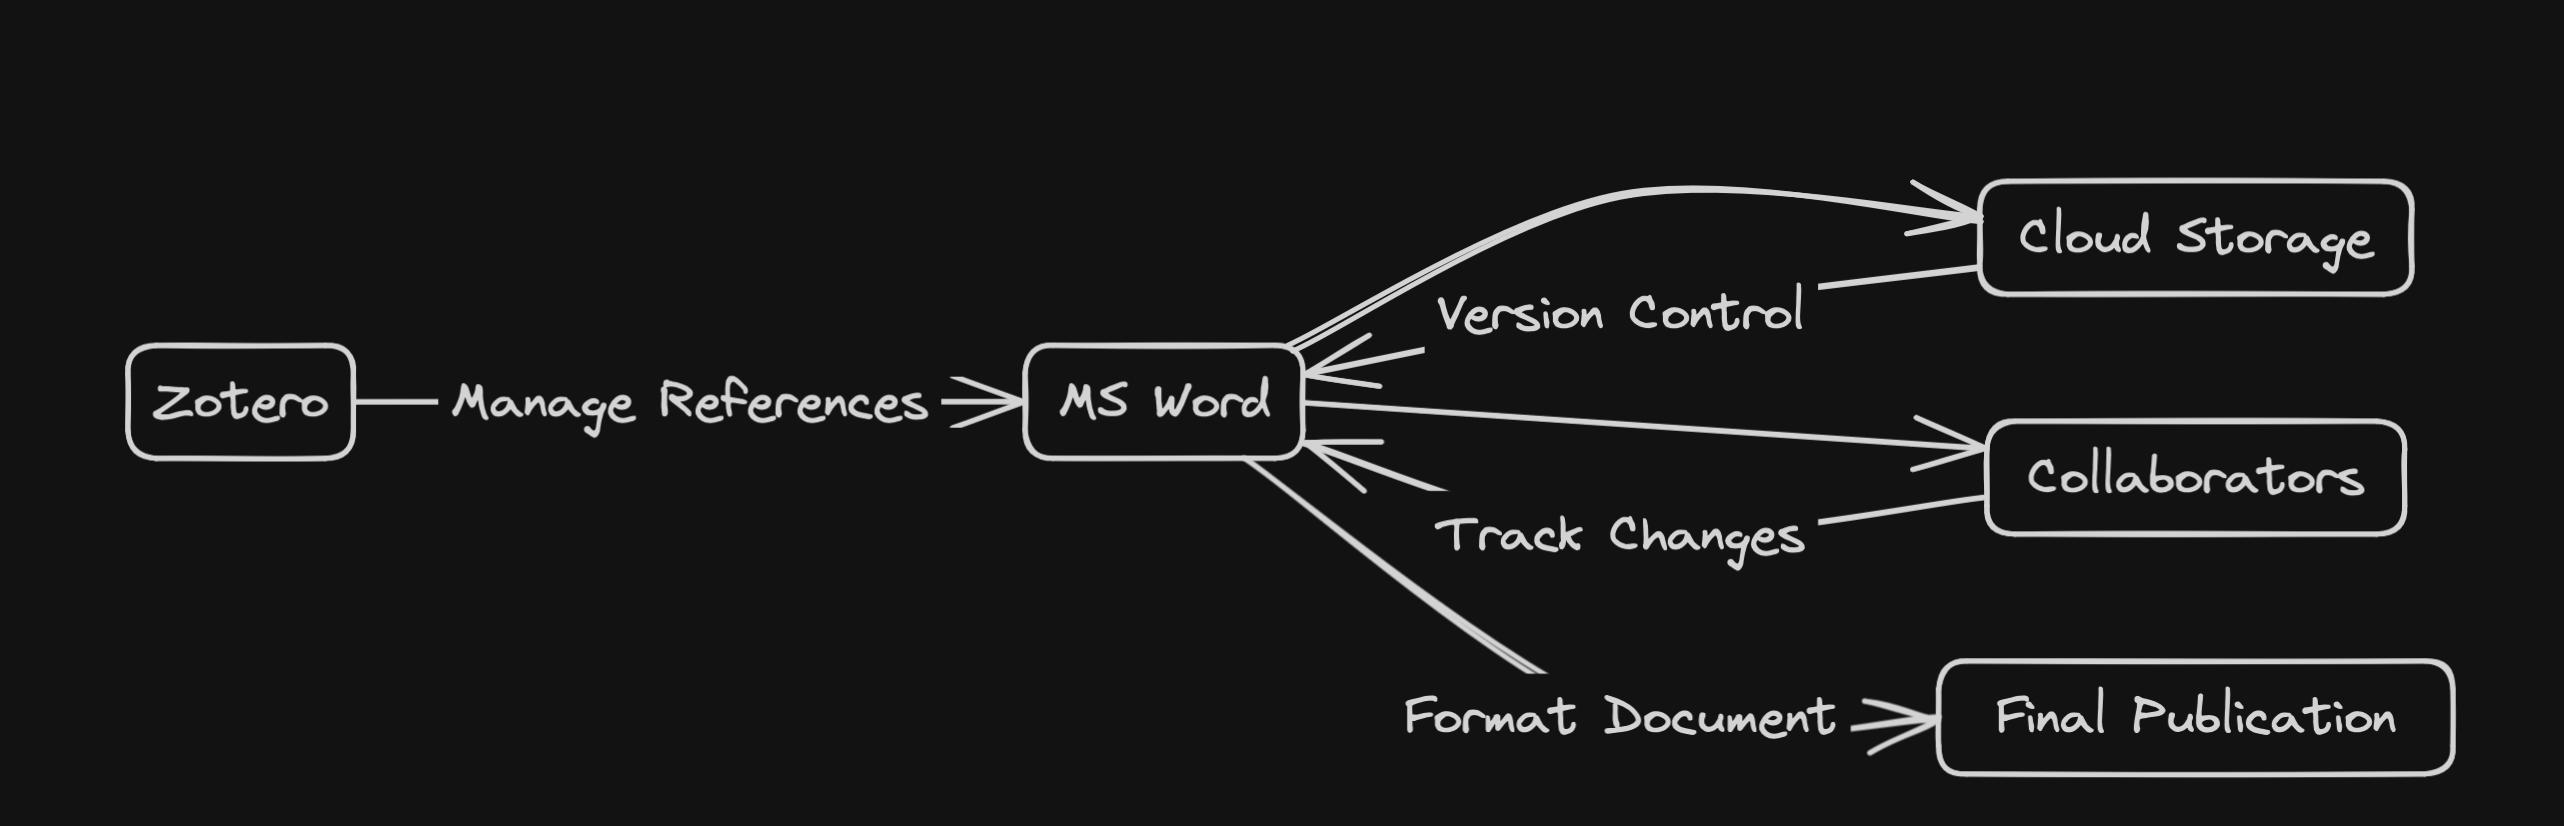
Microsoft Word
Like it or not, MS Word is by far the most used writing tool. It has embedded its way into universities and industry alike. MS Word makes it comparatively easy to generate professional-looking documents with minimal configuration, and is well integrated with other Microsoft 365 products.
Track Changes
MS Word’s “Track Changes” feature is incredibly useful in collaborative settings. For collaborators working on the same document, each author can add comments and make their own edits, with all changes saved in a clean markup format.

This feature is invaluable in asynchronous collaboration. It’s as easy to use as turning on “Track Changes” under MS Word’s “Review” panel.
Zotero Plugin
MS Word offers many plugins, which greatly extend its functionality. The Zotero plugin allows you to insert citations from your Zotero library, and handles much of the formatting for you. For papers with 50+ citations, performance suffers, but this can generally be alleviated by turning off “Automatically update citations.”
Figure References
Within MS Word, you can insert captions and cross-references using Word’s “References” panel. This allows you to automatically manage Figure, Table, and Equation references within your document as the content is moved around. While this is more cumbersome than pandoc’s cross-ref or LaTeX’s \ref{} and \label{}, it replicates the same functionality.
Cloud Storage Provider
Nearly all organizations have access to some form of shared cloud storage, whether it be Box, Google Drive, OneDrive, or some other system. Many of these offer limited storage for free to small teams. These tools contain limited control systems, that allow you to observe the changes in a document over time and revert to a previous edit if needed. While not as robust as a git-based version control system, this often suffices for collaboration where authors work sequentially rather than in parallel.